Spokane Productions has a professional 25′ x 15′ Infinity Wall, more formally known as a Cyclorama. We designed and constructed it to meet our requirements for the studio. During the planning phase, we learned a lot from several studios who had shared their build ideas. We thought it would be beneficial to show how we made ours so others can benefit from our experience. Overall, we had relatively few issues but will mention some things we learned. I am a Cinematographer, Editor, and Photographer, but have a construction & framing background so this was something I had done before and I was comfortable tackling it. Build at your own risk, construction can be dangerous and it’s better to hire a professional if you aren’t completely confident in your abilities. We take no responsibility for your actions based on this article, however we hope it is helpful for your studio build.
We envisioned a multipurpose space, able to host video production shoots such as interviews, television commercials, fashion spots, educational series, broadcast events, and the like. In addition, the wall can be used for still photography such as full length corporate portraits, headshots, fashion photography, group photos, and even product photography. Any video shoot is not complete until clean audio is recorded and we took that into consideration as well. The opposing walls are completely covered in floor-to-ceiling acoustical foam and the dedicated sound booth is quiet and comfortable. The main floor is carpeted to further absorb any wayward sound waves while recording.
A Cyclorama Wall is versatile because it gives the illusion of open space, though the subject is actually standing in a small area. Like this scene from the Matrix
“The Matrix” / Warner Brothers
It can be used as-is for a non-distracting white background in a video, or to easily remove the background in a portrait (clipping path) for use on clean white websites. You can host a band and shine colored spotlights on the wall to set the mood and add interest. You can use overhead LED panels to “color” the wall nearly any solid color for mood lighting. Or project a picture behind your subject for music videos or presentations. The green screen can be used to cut out the background in a live video stream, a technique known as “chroma keying” which places your subject on a digital news set, alternate location or any background you can imagine.
Here is the space before we began. It was used previously by a Church and was basically an open rectangular carpeted room. The white walls on the right will be turned into our infinity wall and the brown wall to the left will become our green screen wall. The spot where I am standing to take the photo eventually becomes our sound booth.

The first thing we did was make a plan for how to build the sweeping wall. I knew we had to build a lot of parts for the curved sweeps so I decided to enlist the help of a friend who owns a cabinetry shop. They have an awesome wood CNC machine and they milled our parts for us in no time at all. It was worth every penny paying them to do it. Their machine nested all the parts within a 4′ x 8′ sheet of plywood automatically to make the best use of space.

Below is the CNC Machine making the cuts. One issue we experienced was that we had some failed cuts since the small parts kept moving around. So I recommend cutting more than you need. We cut 2 sheets of 4′ x 8′ standard 3/4″ plywood and an extra “test piece” of 3/4 MDF and we used every bit of it. We were glad to have the test piece when we got toward the end of the build, especially in the corner.

We wanted to use standard 2′ high by 2′ deep “sweeps” spaced 4′ apart but we had nontraditional steel frame building walls with no vertical studs in some places so we needed to add a notch for 1×4 runners behind and below the sweeps. This turned out to be a lifesaver for assembling the wall and for the stability of the build.


We glued the parts together with wood glue and used a finish nail gun to build them in ~8 foot sections, then installed each section accordingly. We were able to use a combination of standard 3″ screws into studs and sheetrock anchors where that wasn’t available. We also glued extensively with Liquid Nails.

These sections will have an 8 foot wide flex sheet (Hardboard Tempered Panels) installed over them so you need to lay them out so that the sheet meets halfway over the joining sweep, or you can double them up at junction points if you prefer that way. If you make the sections exactly 8 feet then the next sheet won’t have anything under it. From the right side of the below photo I made the vertical sweep “center” at 96″ or in other words, measure to the end of the sweep at 96 and 3/8″ and then repeated.
In between each space we added 2’x2′ pine boards glued and air nailed together. These will eventually be what the flexible panels will be screwed into.

Once the horizontal floor sweeps were installed we assembled the vertical corner. I ran the 1×4 runners all the way to the floor to support the weight of this part. I did not want only the screws in the wall holding it up.

In our case we had a metal post in the corner so we had to notch the back of the sweeps to fit.

Once the upper section was installed we floated pink insulation behind it (to absorb low frequency sound waves) and began to build the corner sweep where the upper and lower parts meet.

The cool part about assembling the corner is that the same parts you already made can be used here too. The sweeps will lay out against each other perfectly around the corner with very little extra engineering, just a little bracing material. I started with the middle sweep first, nailed it into the wood behind and glued it to the floor.

Then I split the difference with two more sweeps in between. Those extra MDF sweeps from the cabinet shop started to be really useful here.

Here is the final corner once the glue dried. I added some bracing between each of these but didn’t snap a photo of that. You can see the locations of them in a later photo when we put the screws into the paneling.

Next we started to install the 4×8 sheets of Hardboard Tempered Panel material from the outside working our way in. I knew this adjoining corner would be challenging once we got there so it was last on the list.

You may have noticed that the flex panel does not have as much space on the floor as it does on the wall. My theory here was that if anyone stepped on it really hard it would probably be stronger with less material down there. I have no idea whether it will be the case or not, but we have had plenty of stepping (and one kid running) with no issues or cracks yet. I also wanted the seam up on the wall to be as gradual as possible.
We screwed these panels together with standard 1.25″ wood screws. This is best done with two people and takes a specific amount of pressure to get it right. If you turn them in too far they pull right through the wood but if you leave them sticking up you will see them in the paint. The screws need to be just below the surface of the sheeting material, but not too far. I had to reseat many screws that were too far up or too far down later on.

We reached the corner and had the idea that maybe I could cut knife shaped points into the bottom of a full sheet and make it stronger. I used a paper cutout then a cardboard template to figure out the angles. The good news is that my calculations were correct and the parts did actually fit. But that is not the end of the story…

The part that I didn’t consider was just how much pressure that caused on the board and it started to split all over the place. So instead I cut individual parts and screwed them over the sweeps one at a time. This worked fine and I was happy with the seams. We will be using sheetrock mud to fill in all the gaps so there is some flexibility with how precise it needs to be.

We filled in all of the remaining parts and the corner was ready for mud

Next we glued down the floor panels and let them dry overnight. We used a castle trowel to lay down flooring adhesive which it turns out had a high moisture content and we experienced some warping of the panels. We had to re-glue some of them down the next day. In hindsight, using a glue with less moisture would have been better, if such a glue exists. The floor came out just fine in the end.

Then we began filling all the screw holes and seams with sheetrock mud. This took several applications and wet sanding routines to get it smooth. Having lots of trowel variations helped too. Large trowels for wall seams, small ones for filling screws, etc.

Once we got to the corner it began to get more challenging. You can’t fit a square trowel into a round corner, as they say. This looked rough. I needed something better…

I went searching around my garage and found the perfect tool. An old windshield wiper…

I pulled the blade out of the plastic wiper and it worked perfectly. I could bend it into a smile shape and had a smooth flexible rubber trowel of sorts. With the corner figured out and mud looking smooth we gave it another couple of wet sanding runs and it was ready for the next step. Taped off our outer lines with blue tape and started in with a coat of high-quality primer.

Starting to look more like a cyc wall

You can’t use a square roller in a round corner either so I had to brush that in by hand, both primer and final flat white paint.

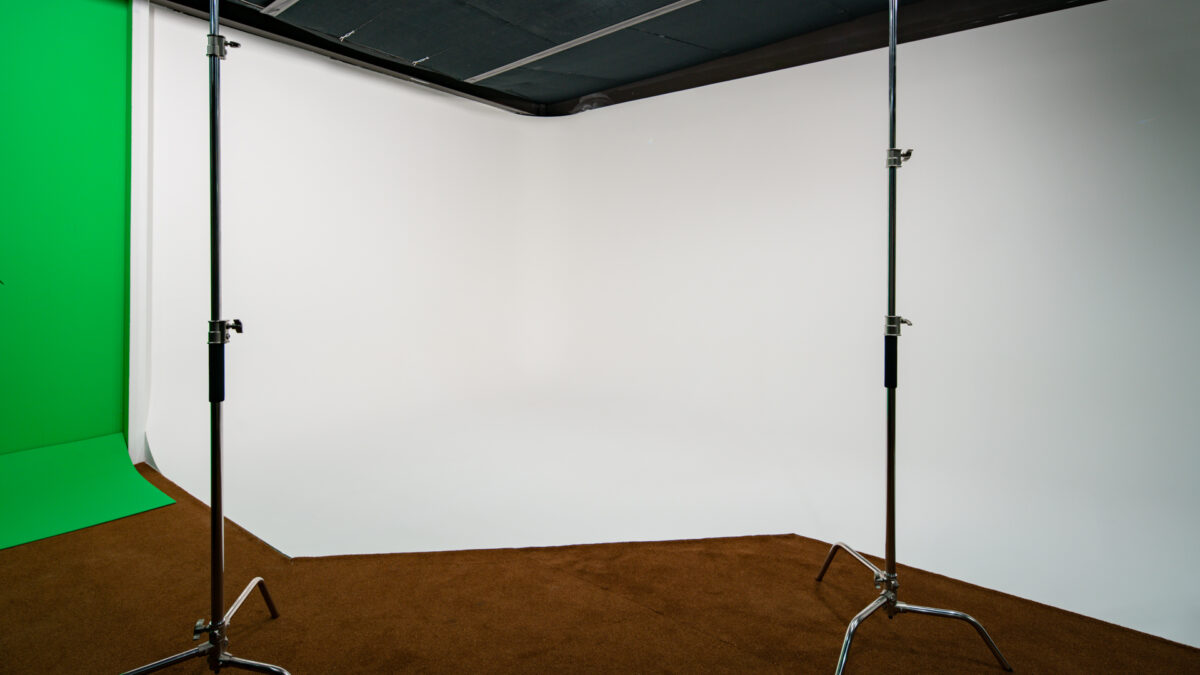
Rolled on several coats of flat white and the wall was done. We also primed and painted our chroma key green screen wall and cut the carpet to length.


The final product looks great, and with direct light on the wall, it looks amazingly seamless, even up close.


If you have any questions about the build or the studio, feel free to reach out here I hope this article is helpful to anyone looking to build a studio space with an infinity wall.